Advanced Features
Advanced Features
Scrambler, compander, DTMF, flashlight, FM broadcast radio, aircopy, calibration, and firmware flashing.
Scrambler
The scrambler inverts or transposes the audio frequency spectrum, making speech unintelligible to anyone not using the same scrambler frequency. This is not encryption — it is easily defeated with basic equipment. It provides minimal privacy.
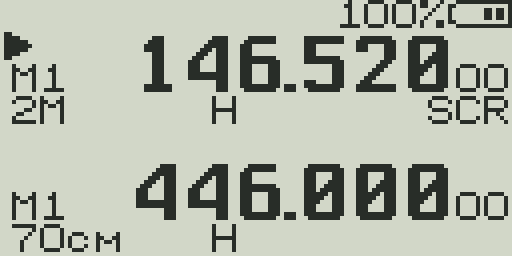
- Master enable: Set
Scramto ON in the menu to globally enable scrambler support. - Scrambler frequency: Set
ScrmFqto the desired audio inversion frequency. Both radios must use identical settings. - Per-channel toggle: With the master enabled, toggle scrambler on/off per channel using
F + 9or via the channel settings. - When active,
SCRappears on VFO line 2.
| Frequency option | Audio effect |
|---|---|
| 2600 Hz | Low inversion point — audio is very garbled |
| 2750 Hz | Default — good balance of intelligibility vs scrambling |
| 2900 Hz | Medium inversion |
| 3100 Hz | Higher inversion point |
| 3300 Hz | High inversion — more audio bandwidth preserved but easier to understand |
| 3500 Hz | Highest inversion point |
Compander
A compander (compressor/expander) compresses audio on TX and expands it on RX, reducing background noise and improving intelligibility on narrow-bandwidth channels.
- Set via
Compndin the menu: OFF / TX / RX / Both. - TX: Compresses your transmitted audio.
- RX: Expands received audio (best results when the other radio also compresses).
- Both: Full compander — both compress on TX and expand on RX. Requires both radios to use compatible compander settings.
- This is a per-channel setting.
- Without a matching compander on the other radio, the expanded RX audio may sound thin or distorted.
DTMF Features
DTMF (Dual-Tone Multi-Frequency) are the tones used in telephone keypads. The UV-K5 can decode incoming DTMF, transmit DTMF, display a contact name from decoded ANI, and send PTT ID.
Live DTMF Decoder
- Enable via
D_Decdin the menu (ON by default). - When DTMF tones are received, the decoded character(s) appear briefly on the center bar of the display.
- The decoder works in receive mode without any special setup.
DTMF Side Tone
- Set
D_STto ON to hear your transmitted DTMF tones in the speaker. - Useful for verifying DTMF digits during transmission (e.g., when accessing autopatch or IRLP nodes).
Transmitting DTMF
- Short press
*to enter DTMF input mode. - Type the DTMF sequence using the numeric keypad (
0–9,*,#, A, B, C, D via F-key). - Press PTT to transmit the DTMF sequence. The tones are sent immediately.
Contact List
- Store DTMF ANI codes paired with contact names via
D_Listin the menu. - When incoming DTMF ANI matches a stored entry, the contact name is shown on the display.
- Useful in dispatch/fleet radio systems where each radio has an ANI number.
Flashlight
The UV-K5 has an LED on top of the radio (next to the antenna) that functions as a flashlight. It has four modes.
| Mode | Behavior |
|---|---|
| Off | LED is off |
| On | LED is continuously on at full brightness |
| Blink | LED blinks at a regular rate |
| SOS | LED blinks the SOS pattern (··· — — — ···) continuously |
Assign the Flashlight function to a side key for instant access. Long-pressing Side Key 1 activates the flashlight by default. Each press cycles to the next mode.
FM Broadcast Radio
The UV-K5 can receive commercial FM broadcast stations (76–108 MHz) using a built-in FM receiver mode.
- Access via
F + 0or the assigned side key function. - Use UP/DOWN arrows to step through preset stations or tune manually.
- Long press UP/DOWN to scan for the next active FM broadcast station.
- Store presets: press MENU on a found station to save it as a preset.
- Up to 20 FM presets can be stored.
- The earphone/speaker functions normally during FM radio mode.
- Press EXIT to return to normal radio operation.
Antenna tip
FM broadcast reception improves significantly with the earphone cable plugged in — the cable acts as a receive antenna for the FM broadcast receiver.
Alarm
The alarm feature produces a loud tone from the speaker and/or transmits a tone signal.
- Tone mode: Plays a loud alarm tone through the speaker. Useful as a personal alarm.
- Site mode: Transmits the alarm tone over the air so others can hear your emergency. Activates PTT automatically.
- Assign the Alarm function to a side key for quick activation.
- Press EXIT or any key to stop the alarm.
Aircopy — Wireless Channel Cloning
Aircopy allows one UV-K5 to wirelessly clone its channel list and settings to another UV-K5 using RF. Both radios must be running compatible firmware.
| Step | Source radio (master) | Destination radio (copy) |
|---|---|---|
| 1. Enter Aircopy mode | Open menu → Aircopy → TX mode | Open menu → Aircopy → RX mode |
| 2. Initiate | Press PTT to begin transmitting channel data | Radio waits to receive |
| 3. Transfer | Radio sends all channels over the air | Radio receives and writes channel data |
| 4. Complete | Transfer complete indicator shown | Reboot or confirm channels are loaded |
- Keep both radios close together (within 1–2 meters) for reliable transfer.
- Aircopy transfers all channel data and some system settings.
- The receiving radio's existing channels are overwritten.
- Aircopy uses a fixed frequency and protocol — do not transmit on other channels during the transfer.
Battery Calibration (BatCal / BatTyp)
If the battery voltage shown on the display doesn't match the actual voltage, calibrate it.
- Measure the actual battery voltage with a multimeter on the battery terminals or USB charging port pins.
- Access the hidden menu (power off, then hold PTT + Side Key 1 while powering on).
- Find
BatCaland adjust until the displayed voltage matches your measured voltage. - Set
BatTypto match your battery pack capacity (1600 mAh or 2200 mAh extended battery) for accurate percentage display.
Frequency Calibration (FrCali)
The UV-K5 uses a crystal oscillator that may drift slightly from the nominal frequency. FrCali adjusts the reference to correct this.
- You need a calibrated frequency counter or a signal of known exact frequency (e.g., WWV time station on 5, 10, or 15 MHz).
- Receive the known-frequency signal and compare the displayed frequency to the known frequency.
- Access the hidden menu and adjust
FrCaliuntil the displayed frequency matches. - The calibration affects both receive and transmit frequencies.
Most users do not need this
The UV-K5 is accurate enough for normal use out of the box. Calibration is only needed if you observe consistent frequency error across all channels or if you are using the radio for precise frequency measurements.
Factory Reset
Two reset options are available via the Reset menu item (hidden menu).
| Option | What it resets | What it keeps |
|---|---|---|
| VFO | VFO A and B frequencies, modulation, step, bandwidth, all VFO-related settings | Stored memory channels, channel names, calibration values |
| ALL | Everything — VFO settings, all memory channels, all system settings, calibration | Nothing — complete wipe to factory defaults |
Warning: Irreversible
A reset cannot be undone. Back up your channel list by noting your configuration or using the rfsplatter.com configurator to export your settings before resetting.
Firmware Flashing
Flash rfsplatter firmware to your UV-K5 directly from the browser at rfsplatter.com/build.
| Step | Action |
|---|---|
| 1. Open Build page | Go to rfsplatter.com/build in a WebSerial-compatible browser (Chrome, Edge, Opera) |
| 2. Configure firmware | Choose features to enable/disable in the configurator panel on the left |
| 3. Preview on emulator | The radio emulator on the right shows a live preview of your firmware configuration |
| 4. Connect radio | Connect the UV-K5 to your computer via the USB programming cable. The radio must be powered on. |
| 5. Enter programming mode | Power off the radio, then hold PTT while connecting USB, or use the bootloader entry method for your specific radio revision |
| 6. Flash | Click the Flash button and select the radio's serial port when prompted |
| 7. Verify | The radio reboots with the new firmware. All memory channels are preserved unless you chose to reset them |
Requirements
- Google Chrome, Microsoft Edge, or Opera (WebSerial API required)
- USB-to-K5 programming cable (the standard Quansheng programming cable or compatible)
- UV-K5 radio (any hardware revision)
- No special software installation required — flashing is done entirely in the browser
Safe to flash
The UV-K5 bootloader is separate from the application firmware. If a flash fails or the firmware does not boot, you can always re-enter programming mode and flash again. The bootloader cannot be bricked by flashing application firmware.